In Simon's class today we had to pick an action and animate it using a pre-existing rig. I based my animation off of a long jump. Here is the playblast for what I did in the lesson:
Showing posts with label Toolkit1. Show all posts
Showing posts with label Toolkit1. Show all posts
Monday, 12 February 2018

Monday, 5 February 2018
Toolkit - Maya Walk Cycle
In Simon's class today we worked on making a walk cycle animation. This is the playblast of the work I did in the lesson:
Sunday, 28 January 2018
Toolkit - The Sound Room
Today Kat showed us the sound room, and told us how to book it if we needed to. I found it really interesting and am excited to have a go in there myself. I really enjoy recording music at home so maybe I could try it in the sound room to get higher quality files.
After looking at the sound room, we started to work on making computer-generated sound in Audition. I really liked trying out all of the different kinds of sounds you could get using the computer. Here's what I ended up with after a bit of experimentation:
After looking at the sound room, we started to work on making computer-generated sound in Audition. I really liked trying out all of the different kinds of sounds you could get using the computer. Here's what I ended up with after a bit of experimentation:
Wednesday, 24 January 2018
Toolkit - Adobe Space Sound Effect
In Kat's previous lesson I was absent but I caught up on what we did today. In the lesson, everyone worked on noise reduction and editing clips to make them clearer. After that, they started work on a space themed sound clip. Here's the one I made:
Friday, 19 January 2018
Monday, 15 January 2018
Toolkit - Pre-Visualisation Continued
In Simon's class today we continued with pre-vis shots. Here's the playblasts from the lesson:
Distance and Tracking
Shot 1
Shot 2
Shot 3
Shot 4
Camera Coverage
Individual ShotsFinal Edited Scene
Friday, 12 January 2018
Toolkit - X-Sheets & Lip Syncing
In Nat's class last friday we did lip syncing for the first time. I thought it was really fun, especially because I've never done it before! We also learned about x-sheets. Nat set us the task to pick an audio clip from a website called the 11 Second Animation Club, and then animate the lip sync to go along with it. I picked a clip they published a couple of months ago from Star Wars, and started to plan it out on the x-sheet template Nat had given us. Here's my sheet:

To help me with the mouth sketches that I drew out, I went online and looked for a diagram with all of the mouth positions for different sounds, and I found this one which was really helpful.

The link to the website below also helped and gave me some good tips for my first time lip syncing!
http://www.keithlango.com/tutorials/old/lipSync.htm
After I finished my x-sheet I used Adobe Animate to make a start on the animation. I imported my sound file in and used the frames I'd written down on my sheet as a guide... However I noticed that I hadn't got my planning completely accurate, so once I'd drawn the frames I had to reshuffle them a bit to make it actually look right. Here's a sketched out version of my animation that I managed to complete in the lesson. It still needs a bit of tweaking, there's a couple of mouth movements that are a little bit out of time. But for now, it's a good start!
Now I've finished the sketch stage, I want to add some more detail to the character's acting, because at the moment he's just stood like a statue. Hopefully that won't take too long to do, and I can move on to drawing up a cleaner version.
Wednesday, 10 January 2018
Toolkit - Non-Linear Deformers
In Simon's previous class we had a look at non-linear deformers and what they can do when modelling in Maya. We tried each of the options in the menu and I thought they all did really interesting things! In future I think it'd be fun to make an animation using the deformers because I looked a bit like they were dancing when you rotated them around! Here's some screenshots on the experimentation we did this lesson.


Simon also asked us to look at the deformer tutorial online, which I had a look at and also found really interesting. It talks more about using the deformers in animation, which is something I'd definitely like to experiment with in the future.
Toolkit - Adobe Dragon Roar
Today was our first Adobe Audition class, and I've found I'm not very good at editing sound, even if it interests me! The lesson started with Kat teaching us about different kinds of sound, about foley, and ambient sound. After this we worked on making a dragon roar, using animal audio clips, based on the picture of a dragon we found. I decided to use one of my drawings because I couldn't really find anything I wanted.
However the sound I made didn't really match my dragon at all. In fact, it didn't really sound like a dragon. It's a bit of a mish mash of strange noises. I don't think there's a way to upload audio files in Blogger - I'm not sure if anyone else has found out a way? Because of this I've taken it into After Effects and exported the picture of my dragon and the audio into a quicktime file that Blogger will recognise. Here it is:
I'm trying not to be too bothered about how bad it is, since it is the first lesson after all. Hopefully I'll improve next week!
Toolkit - Pre-Visulisation
In Simon's Monday Maya lesson we looked at pre-vis. After explaining all of the features of pre-vis, we worked on different animated camera shots and playblasted the finished examples.
Pan Rig Playblast
Staircase Rig Playblasts
180 Degrees:
360 Degrees:
720 Degrees:
Pitch Rig Playblast
Dolly Rig Playblast
Crane Shot Playblast
Monday, 4 December 2017
Toolkit - Maya Alley Details & Rendering
Today in Simon's class we finished off our alley! Mine isn't completely done because I need to put the crates in still (I'd also like to play about with the lights a bit more!) Apart from that, I'm all done, and I've got a render that we edited in Photoshop to make it extra polished. I think it's looking really good so far!

Monday, 27 November 2017
Toolkit - Texturing and Modelling Tips
Today in Jordan's class we looked at texturing and modelling. To texture you need a square image with flattened UV's (that you can get by taking a UV snapshot). It needs to be in the ratio of 512x512 at the lowest, but preferably 2048x2048 and 4096x4096.
We also learnt a few tips about modelling, and how to start. First you need to block out the environment by making the larger structures first, keeping them simple. Then it's good to identify the focal point and make a new camera to put in, so you can see what the best angle is, and what you need to model. There's no point in modelling something that you can't see through your camera! Then, once you've locked down the camera, you can start working on the modelling, defining some more details and then moving onto texturing, lighting and rendering. I thought these steps would be quite good to follow so I've put them up onto my blog so I can refer back!
Throughout the lesson we were shown lots of different artist by Jordan, but one of them especially caught my eye. His name is Eran Hilleli and I thought his work was really eye-catching: not only his environments, but his characters he has modelled have a colourful and simple style that I'd love to someday replicate in my own work.
After looking at his blog in my spare time on Tumblr, I was really interested in some of the techniques he uses. I like the look of having the image 'grainy' and 'fuzzy', and I wonder what Hilleli has done to achieve that. I think it's a really interesting effect! Here's some examples of his work.


Toolkit - Maya Textured Alley
Today in Simon's class we continued working on the alley. I have now textured it and added in lights, but I'm a bit behind with my lamp post and crates as I still need to put these into the scene! Hoping to do that soon, and then I can finish off the alley and continue tweaking with lights after I have all of the objects in there.
Here's a render of my progress so far!

Friday, 24 November 2017
Toolkit - Parallax
In Simon's lesson today we experimented with the parallax effect in Photoshop and After Effects. We started with a painting that we had divided into foreground, middle ground and background. Then, in After Effects we imported in the Photoshop file and made a video to make it look like the painting was moving! Here's the painting I did in the lesson (not very finished!) and the final video. This is definitely something I'd like to try again in the future!


Monday, 13 November 2017

Friday, 10 November 2017
Toolkit - Animator Reviews
Lotte Reiniger
Lotte Reiniger was a German animation artist that specialised in the method of silouhette animation. She liked to base she animations on fairy tales and folk myths. Her work can be described as avant-garde: something new and experimental. She made over 40 films during her career.

As a child, Reiniger was interested in the Chinese art of silhouette puppetry, and built her own puppet theatre so she could make shows for her family and friends. In 1918 the success of her work got her into the Institute for Cultural Research, an experimental short film and animation studio. Here she met a lot of other avant-garde artists, as well as her creative partner and husband, Carl Koch. Reiniger directed her first film in 1919 and it was a big success, despite only being five minutes long. She made six more short films in the following years with her husband.
In 1923 she was asked to create a feature length film, which was a large proposal as nobody had made a short film longer than about 10 minutes before. The result of this proposal was The Adventures of Prince Achmed, which was completed in 1926. It became a critical and popular success. Following this success Reiniger made another feature called Doctor Dolittle and His Animals, which was completed in 1928.

Reiniger's style of animation was very unique and preceded Disney by 10 years. When she died in 1937, she left a lot of unfinished work, as well as a lot of inspiration for people to pull from in later decades. The fairy tale, childlike style of her animations are clearly reflected in Disney as well as lots of other early short films.
Don Hertzfelt
Don Hertzfelt was born in 1976 is an artist, writer, animator and film maker. His work commonly features hand drawn stick figures, some include heartfelt and existential themes whilst others are more light comedy. His animation is created traditionally on pen and paper, with minimal digital aid. He uses old-fashioned special effects, like using an old camera to capture his work and multiple exposures.
After graduating from school with a BA in Film Studies, he made numerous short films independently, from 2000 to 2015. His first one was called Rejected, released in theatres in 2000. It was a massive success and has won dozens of awards, as well as being nominated for an Oscar. In 2005, Hertzfelt released his next film, The Meaning of Life. Despite being a bit abstract it still received many positive reviews.

Everything Will Be Ok was released in 2006 and became Hertzfelt's most successful piece to date, and has won just under 40 awards. I Am So Proud of You was the second part to this story and was released in 2008, and the third and final chapter, It's Such a Beautiful Day, was released in 2011. He went on to publish more short films afterwards, as well as working on an opening sequence for The Simpsons. In 2015, Hertzfelt released his first digital short film called World of Tomorrow, which was hand drawn on a Cintiq tablet.
Hertzfelt's animations are very different to traditional methods, but still absurdly popular with audiences today. The old techniques he uses are essential to the whole feel and look of his films, as well as his adult humour.
Toolkit - Concept Art and Colour Theory
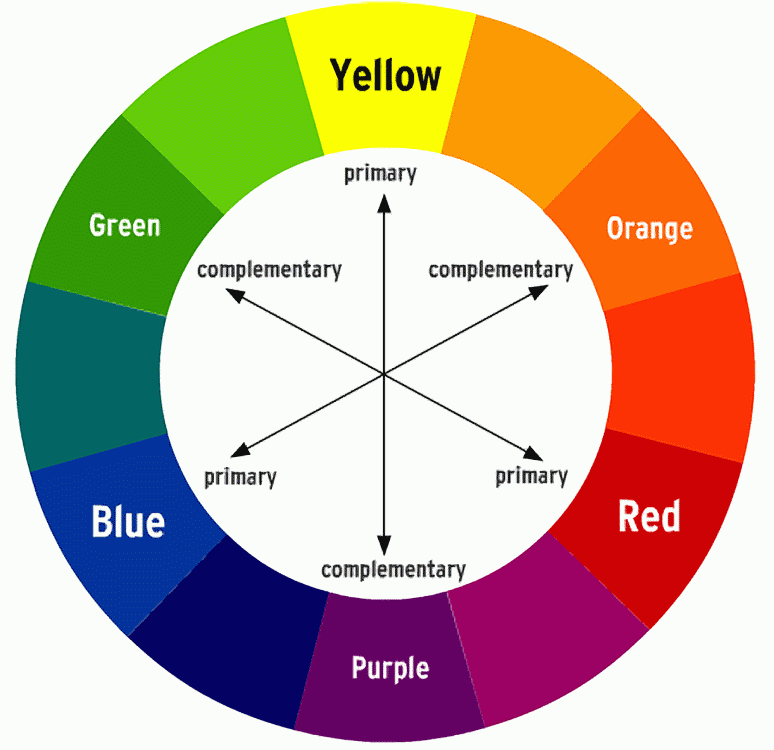
In Jordan's Photoshop class, we worked on some concept art for our cities. I drew out a few different designs which I have published in my last Invisible Cities post. As well as this, we went over colour theory, which was very interesting. I wanted to make a note on here of what we learnt about colour so I'll always have something to refer back to.
We learnt about the basic colour wheel, and we went over hues, tints, tones and shades. What interested me the most was how to pick your colours using different methods. You can pick your colours based on whether they are complementary or not. By doing this, you'll be able to make your art pieces pop a bit more: for example, if you have a red environment and use blue shadows, it'll look a lot more vibrant and interesting, compared to just using a darker red for the shadow (which is what I usually do!)
Toolkit - Timing in Animation
In Nat's lesson last week we worked on timing. I wasn't in this lesson, but I managed to gather enough information to understand what I needed to do! In the GIF below are the examples I've made that I'm pretty sure was covered in Nat's class.

The top ball is travelling at a constant speed from one side of the screen to the other, whereas the one below it eases in, speeds up, and then slows down to ease back out again. To ease it in, you need to include more frames at the beginning, then do less to make it speed up. The class then applied this logic to a pendulum swinging back and forth.

In this pendulum example, you can see that the ball is swinging at a constant speed, and it doesn't really look that natural at all. However, if you apply the 'ease in, ease out' principle to it, and add in an arc to give it a more natural swing, the whole animation suddenly looks a lot smoother:

It was interesting to apply this logic to different scenarios, and I can think of lots of different ways in how it can be helpful in animation, such as a car speeding up and slowing down, a ball, or other objects. Hopefully I've accurately covered all I missed in that lesson, this is as much as I could gather from talking to Nat, my classmates and also looking at their blogs!
Subscribe to:
Posts (Atom)