Thursday 28 September 2017

Toolkit - Maya Lessons 1&2

Our first Maya lesson was just a small introduction, where we were shown a presentation then went into Maya in the last half hour of the lesson. We were taught some basic tools, like how to move around, change perspective view and turn soft select on and off. Although we didn't have much time to use Maya in the first class, I was still happy to get back into it after not doing much this summer.

In our latest Maya lesson, we had to design some characters based on different stereotypes we were given. Mine was beatnik, and we also had the added challenge of making them aliens/monsters instead of humans. We also had to draw a table and put three random numbers up to four in. We later found out that this would be the number of arms, legs and eyes our characters would have. We started with eight very simple shapes, drawing what we think the silhouette of our character could look like, and not adding much detail at all. Here are my original eight:


After that, we walked around the room and talked to the rest of the class about our designs. We had to pick three designs out of the eight to develop, and I chose the ones that have numbers on above. My most favourite design, (no. 2), was a bit of a mistake because I didn't do any arms when I was supposed to do three! However I really liked it, so decided to develop it further. Here are my three developments:


After this, we got to pick one to make as a final design. I chose number two, because it was my favourite even though it didn't have the right amount of arms! Here is my final design.


We scanned the final design onto a memory stick so we can work on it in a week or so. We'll be taking it into Illustrator to make a digital design then modelling it in Maya.

Invisible Cities - Thumbnails 8-34

I've continued making thumbnails for the Invisible Cities project throughout the week. I'm working hard on trying to develop some ideas, but I still need a bit of practice. To experiment, I've drawn some of the thumbnails in Photoshop, but honestly I didn't like that method much at all. If I do any thumbnails in Photoshop again, I don't think I'll do it in a line drawing format as it's just too messy and inaccurate. We explored some other methods of drawing thumbnails digitally in Jordan's class, which I'll be posting about soon. For now, here are all of the thumbs I have so far.


I have a bit of an interest in Fedora, where there is a different globe showing a different version of Fedora in every room. I've only done a few thumbnails for it so far but once I've done some basic designs for all of the cities, I'm going to go back and develop my favourites. I also like Baucis, just because I've had quite a few interesting ideas of what a city in the sky looks like! I'm looking forward to exploring these cities further in a week or so.

Life Drawing

These are some of the life drawings from our second lesson. I enjoyed experimenting with different materials, and even though I'm not very pleased with many of the drawings, it was still fun to try something new. I especially enjoyed the last drawing, where we were given black paper and chalk to draw the model. I'm hoping to try that method again next week!


Thursday 21 September 2017

Contextual Studies

Today we had our first contexts lesson and I found it very interesting, so decided to do a quick blog about it. We were given the brief to write an 1000 word essay by December, which I think is very possible in that time frame. I would like to write my essay about post-modernism in film, but I don't have much development on this idea yet.

What really captivated me was when we had our first lecture, where we were helped to really look at different inspirations for our Invisible Cities brief. We were introduced to a few different ideas, and I've made a small list of things to consider when attempting my next thumbnails:

  • Angles
  • People - who lives there?
  • Map
  • Style of time period
  • Does it tell a story?
  • Level of detail
  • Utopia or dystopia?

One subject that also really interested me was the concept of 'non-places'. This is a phrase used to describe a place where human beings remain anonymous and where they do not hold enough significance to people to be described as real places. For example, a bus stop or a supermarket could be described as a non-place. This is something I felt really drawn to, and I'd like to explore this further in my next thumbnails for Invisible Cities. I now feel a lot more inspired after this lesson, and I can't wait to get started on some more drawings. More to come soon!

Invisible Cities - Thumbnails 1-7

I've spent the last couple of days working on some thumbnails for my Invisible Cities project. I have started with Armilla and now moved onto Baucis, making a few different designs on what the two cities could look like. These are the first 7 thumbnails that I've drawn out.


I've never been a very good 'ideas person', but it's always something I've been desperate to improve at, so I hope these aren't too bad. I would absolutely love any advice on how you come up with ideas and get it down on paper. I always seem to have trouble with it which isn't very useful when you want a career in the creative industry!

I don't really have a favourite thumbnail so far, but it's early on in the process so I'm sure I'll find one that I'll be happy with later. For now, I'm going to keep coming up with basic ideas for each city, and once I've covered all of them I can continue on with developments of my all my favourites. It's a bit daunting thinking I have to make 100 thumbnails when I've found it quite challenging just to come up with 7, but I'm hoping as I get used to this process it'll become more natural to me.

Any advice or constructive criticism is appreciated!

Wednesday 20 September 2017

Film Review - The Cabinet of Dr. Caligari

The Cabinet of Dr. Caligari (1920) is a dark and enthralling film about a somnambulist, created by Robert Wiene. Despite it's age, the plot, environment and acting are to the standard of a modern day film, making it one of the most prominent movies of its time.
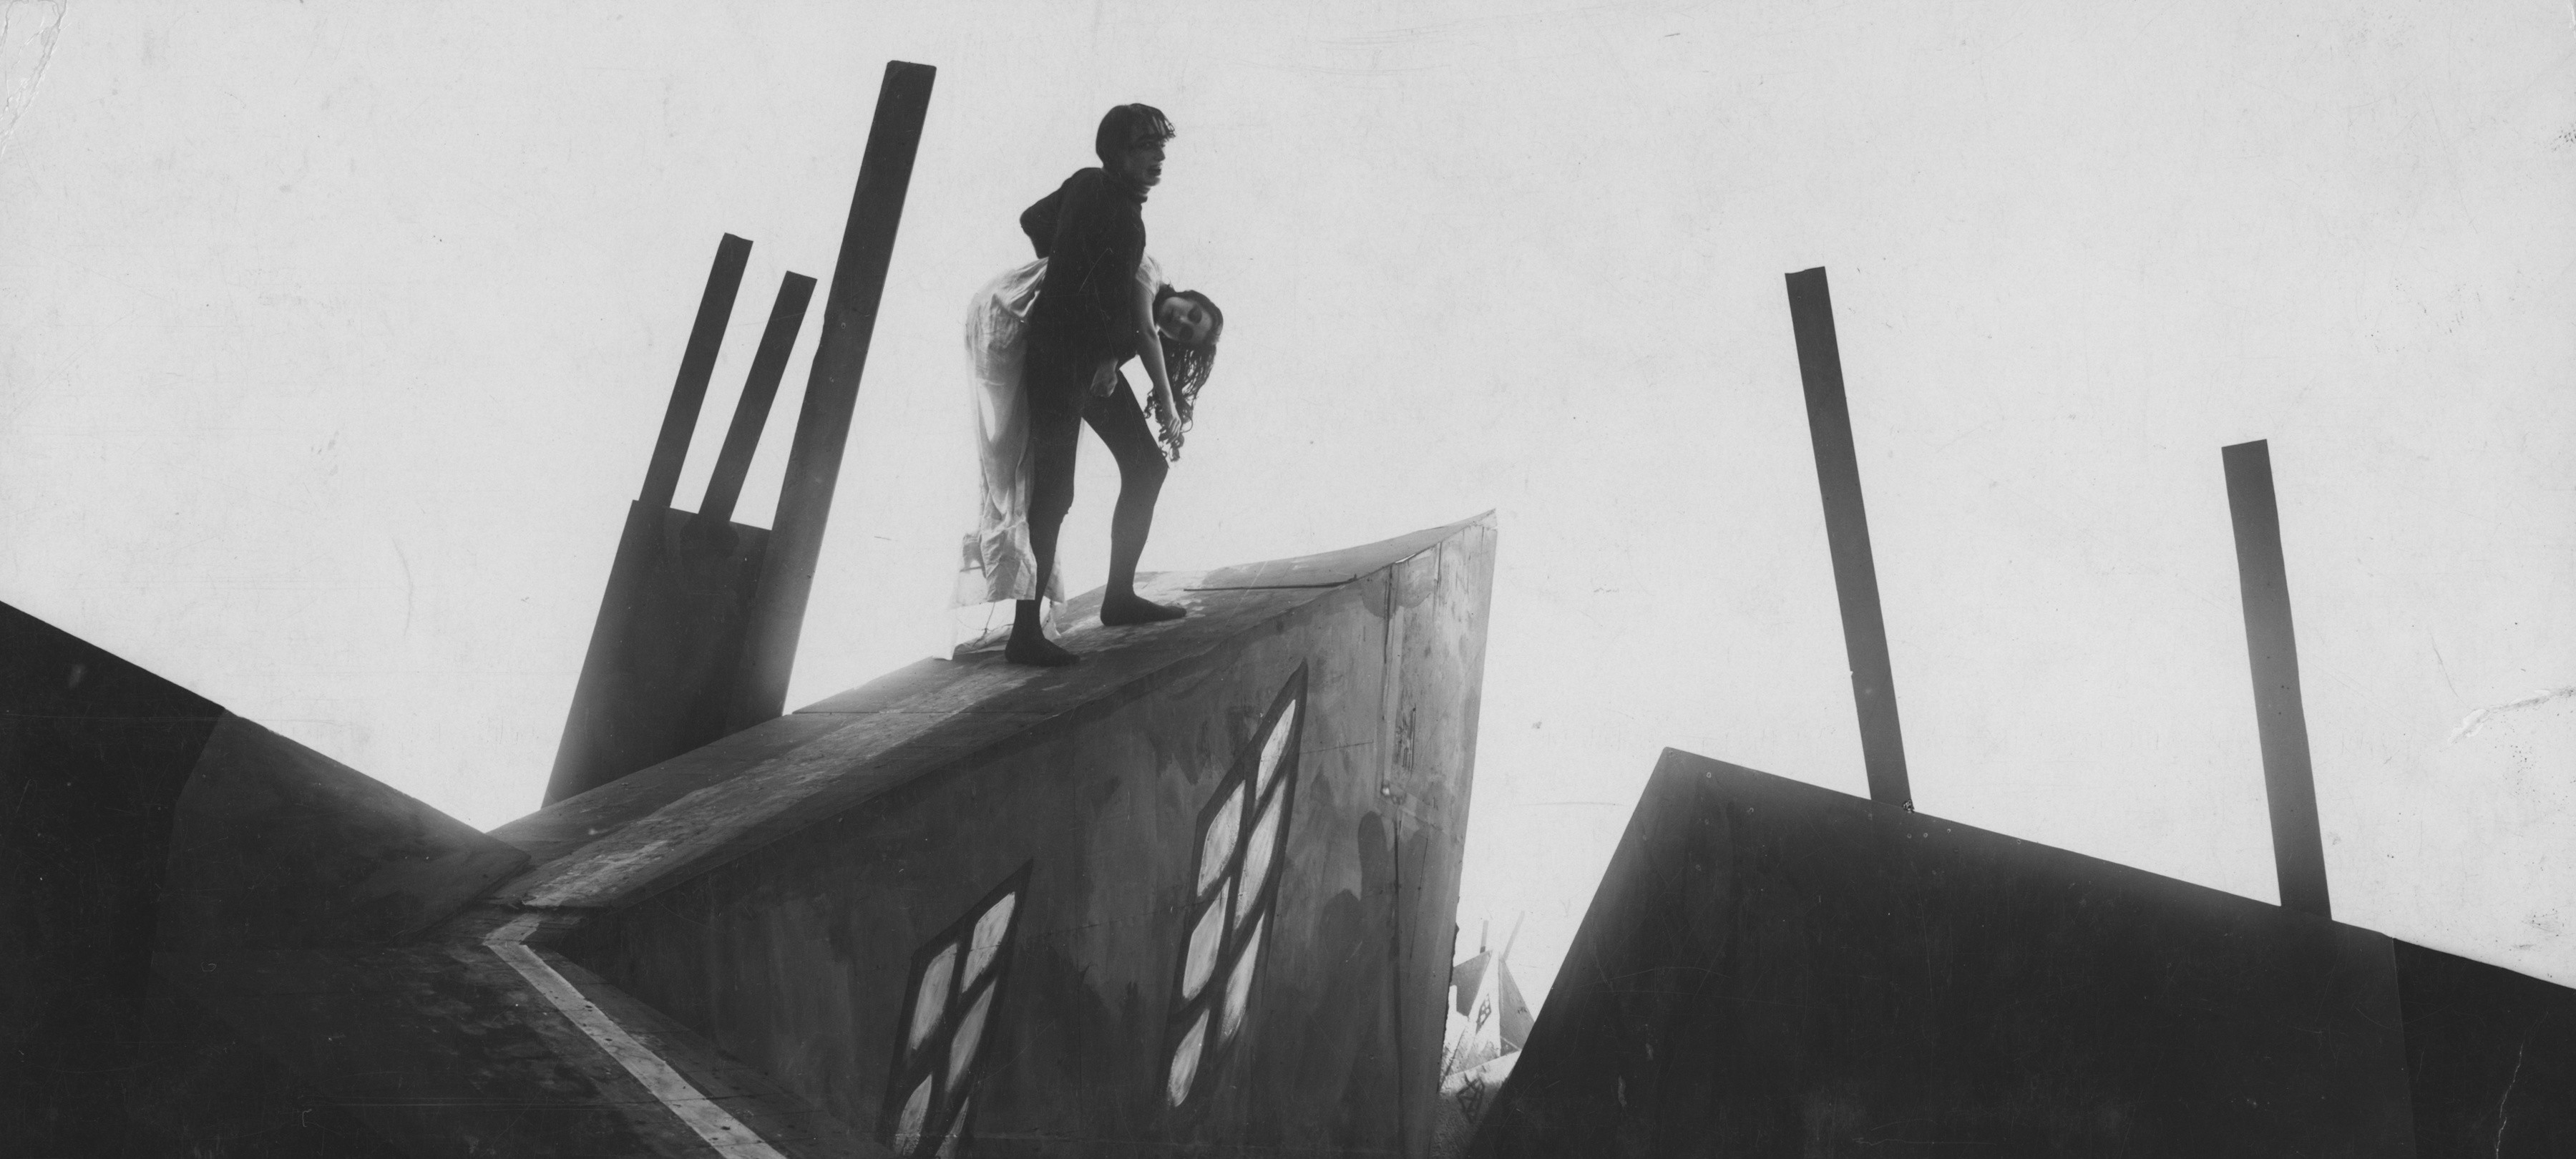
Fig. 1

Described by The Guardian as "a timeless classic, and a visual archetype" (Kermode, 2014), the plot follows Franzis, a young man who investigates his friend's brutal murder and discovers it was the work of a madman, Dr. Caligari, who manipulates a somnambulist, Ceasre, to commit crimes for him. However, there is a twist at the end of the film that reveals it is in fact Franzis who is the madman, obsessed with Dr. Caligari's work. Franzis has devised this whole world around the story of Caligari using the characters around him in the insane asylum where he resides, with the director of the asylum assuming the role of Caligari himself.

The art style in this film reflects the plot amazingly well; where the use of broken perspective creates an otherworldly, almost nightmarish experience. In a review by Roger Ebert of The Cabinet of Dr. Caligari, the scene design is described as "a jagged landscape of sharp angles and tilted walls and windows, staircases climbing crazy diagonals, trees with spiky leaves, grass that looks like knives." (Ebert, 2009). This is a very accurate description of the unique art featured in the film, and Wiene has done this to show we were in a broken place all along: in the head of a madman. This foreshadowing, which lead to the viewer finding out that the story was just the wild fantasies of Franzis, is an excellent example of how the art in the film mirrors the story perfectly.

Fig. 2

There is no denying how influential The Cabinet of Dr. Caligari was in its time, where films used to be a very accurate depiction of real events. The movie is a stark contrast to this stereotype, with the acting and environment being used as a tool to enhance the story, to tell the reader that all isn't well in this world (in Franzis' head), instead of simply showing things as they would actually appear. In a review by Jacob Oller, he accurately sums this up by stating: "this film is here to unnerve you without gunfights, car chases, or any of that ilk. This is creeping discomfort, crawling in your trapezoidal windows and haunting your dreams." (Oller, 2017).

The Cabinet of Dr. Caligari is a film that represents both the unrest in Franzis' mind, as well as having a real world reflection on World War 1. The broken perspective, as well as the story, showing the control that Caligari has over Ceasre the somnambulist, can be likened to the extreme control the government had in the German society, in a position of power over helpless people. Wiene has created a very significant masterpiece that has influenced many films to follow, and was a prominent factor in the making of movie culture as it is today.


Bibliography
Oller, J. (2017). "Psychological Horror Has Been A Thing Since ‘The Cabinet of Dr. Caligari". In: Film School Rejects [online] Available at: (https://filmschoolrejects.com/psychological-horror-thing-since-cabinet-dr-caligari) [Accessed 21 Sep. 2017].
Kermode, M. (2014). "The Cabinet of Dr Caligari review – a timeless classic and a visual archetype." In: The Guardian [online] Available at: (https://www.theguardian.com/film/2014/aug/31/cabinet-dr-caligari-review-mark-kermode-timeless-classic) [Accessed 21 Sep. 2017].
Ebert, R. (2009). "The Cabinet of Dr. Caligari Movie Review" (1920) In: The Guardian [online] Available at: (http://www.rogerebert.com/reviews/great-movie-the-cabinet-of-dr-caligari-1920) [Accessed 21 Sep. 2017].

Illustration List
Fig. 1 - https://homemcr.org/app/uploads/2011/04/The-Cabinet-of-Dr-Caligari-3-e1412607754507.jpg
Fig. 2 - 
https://upload.wikimedia.org/wikipedia/en/e/e2/The_Cabinet_of_Dr_Caligari_Holstenwall.png

Life Drawing


Today was our first life drawing lesson! I've been so excited to get some life drawing in as I've done it before and I've really enjoyed it. The class was great, and I learnt a lot, like drawing bigger and using different kinds of strokes. Next lesson we will be doing continuous line drawings and I can't wait for that. Here's what I did this lesson.

We started with a 20 minute pose -


It came to my attention after drawing this that I'd done it really small on my A1 page, which was also pointed out to me by everyone else! I learnt from that and resolved to do my next drawings a little bigger.

We then did some quick poses all in succession, starting with 5 minutes, going down to 1 minute and then back up to 5 again -


I enjoyed doing these quick poses, because it really loosened me up and got me into the habit of drawing quickly and using my time efficiently. I don't like these poses much, and it didn't help I wasn't great at taking good pictures of them either! However it was nice to give it a go.

Lastly we did another 20 minute pose, and this time I filled up the whole page!


I loved my first life drawing lesson and can't wait to do more next week.

Tuesday 19 September 2017

Toolkit - Photoshop Master Studies

Yesterday I had my first Photoshop lesson. I really feel like I learnt a lot during the lesson, and I'm very excited to blog about it!

I thoroughly enjoyed working on master studies in Jordan's Photoshop class. The session involved picking a painting by a well-renowned 'master' of painting and redrawing it. The first one we did was in black and white, the second was in colour but using the eyedropper tool, and the third was without the eyedropper tool, so I really had to focus on what colours had actually been used in the original painting. Here are my three master studies!


I'm pleased with how these turned out, and I really liked doing it too! I finished the last one (on the right) at home so that's why it's a bit dodgy as I didn't have the same brushes I used in class. If anyone knows how to get Jordan's brushes at home I'd love to know! That's it for now, I'll be uploading some thumbnails, film reviews and essays in the next few days (hopefully!) so there'll be another update soon!

Friday 15 September 2017

Perspective


Hello!
Today I started work on my Invisible Cities project by doing some perspective drawing practice. The last time I tackled perspective was during art GCSE and I remember it being a very stressful and confusing subject. However, after going through some online tutorials I feel a lot more confident. Because I could go over the tutorials at my own pace, I didn't have any trouble learning about 1-point perspective, and then moving on to 2-point and 3-point. I'm pleased it was an easy exercise as perspective has always been something daunting to me but I've now realised it wasn't much to worry about at all. Here are my three sketchbook pages, showing 1,2 and 3 point perspective respectively. I prefer to use red (and blue) pencil in my sketchbook so I hope everybody can see it ok!


Now that I've completed this task, I'd like to move on to writing the 'Who's Who?' about my selected concept artist. I've already chosen who, it's just a matter of writing about them! Stay on the lookout for that as it'll be up in the next few days.

Monday 11 September 2017

Hello!

My name is Chloe and I am starting the first year of UCA Computer Animation Arts. I didn't receive the email that specified the summer work so I don't have anything to show, unfortunately! 🙊

Here's a small drawing of a dragon I did a month or so ago. It's just a silly little thing but I thought I'd include a tiny preview of my work. I'm sure there will be more to come!